Friday, May 20, 2011

The First Time

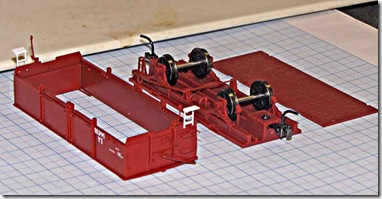
BGM GY instructions

Do you remember the first time, I certainly do. For years I had been a aircraft, ship and military modeller but there were certain moral issues related to the construction of military models particularly those from the Nazi and Soviet sides (they had all the good tanks!) so my then girlfirend (now a Fellow of the Society of Antiquarians) suggested a trip to the Model Railway exhibition at Camberwell and as a consequence a copy of the Australian Model Railway Magazine was bought and that lead to a decision to model Victorian Railways and inevitably to my first train model.

My first was a Broad Gauge Models GY Wagon in HO scale which I bought from Trainworld at Brighton. I don't know the name of the bloke who sold it to me back in 1982 but he also sold me the brake gear and couplers  the basic model was $6.85. He was really helpful and encouraging.

I was searching through my stuff last weekend and found what may well be the instructions for the first one so I scanned them as a curiosity.

In fact the GY was the first rolling stock model for BGM. They started in 1980 and produced a few bits and bobs before moving into importing brass models from Samhongsa (the first one was a K class) and developing a range of plastic wagon kits of which the GY was the first. Both the K and the GY were announced in late 1981.

BGM transformed the VR modelling scene by producing (virtually) RTR HO scale models of rolling stock which meant anyone could easily model the VR. 

In April 2011 David Foulkes of Steam Era Models released a retooled GY – a much improved kit based on the original BGM moulds which i think he did back in 1981-82.

Friday, April 15, 2011

Black Clouds

The coming thing in computing was supposed to be “cloud computing” your precious files were to be stored off site (i.e. not on your computer) and your software was to be provided off site as well by the software manufacturers. The model sees computer service as being like a utility. Google in many devious ways is pushing this model.

Being a Luddite I have always been suspicious. Security is an obvious issue, so is cost (if the computer geeks are saying it is good for all of us then no doubt more money will flow to Google or Microsoft).

Examples of cloud computing are the various photo programs like Pisca, Flickr and, of course, Fotpic where photos could be stored and shared. Like many of these there was a free account option and then more deluxe accounts required payment.

Everything was fine until a black cloud emerged around the 8th March 2011 and it went off line. By the 31st of March it was established that the site’s owner Snappy Designs Ltd had gone bankrupt. It is not clear how the owners of the images can recover their images if indeed they can. The phrase “the lawyers’ picnic’ comes to mind.

I only post copies of my images on Flickr and keep originals at home. I feel really sorry for those who have lost their original images especially as they thought they were safe on Fotopic.

The whole saga should result in a revision of the cloud computing model – what does happen if the site goes down; how do you get your stuff back; indeed do you have a legal right to get it back? Which law applies?

I’ll take my risks with my home set up.

2008 11 21 Al and Maud 006 


Monday, March 7, 2011

Forestville 2011

Someone once said that the Menzies era in Australia was not 15 years of Menzies but the same years over and over again – so it is with the Forestville Exhibition.

It must be difficult to organise an exhibition and to get layouts and their owners to attend but Forestville seems to have the same layouts over and over again creating a sense of dullness. Not Dungog again! It is a perfectly good layout and modelling standards are high but it is a perennial and nothing seems to have changed. The only way to freshen it up would be to do something radical like run a time table or run it with operators in front of it with humanity.

But the long trek from Concord to Forestville was not wasted. Some interesting works were found in the second hand stall along with a Athearn CF-7 that was $30 less than the one on the Model Rail Craftsman stall.

Pirrama Park details for Jane's construction finishes ProjectHere it is stretching out on the rolling road.

One layout that was worth a second look was Bavaria based on German practice and extremely simple, a loop through scenery with a siding at the station. Unlike most German models it lacks “humour” (no fire houses on fire), “naughty scenes” or flashing lights on emergency services vehicles.

Pirrama Park details for Jane's construction finishes Project Note how the model is displayed in its own world, the layout height, presentation of the back scene and the close lighting creates a bright and attractive model.

Pirrama Park details for Jane's construction finishes ProjectThe use of standard detailing items such as Noch products is excellent in my view and not overdone as often is the case. The downside is the tail chasing nature of the train operations which tend to be a bit boring.

Nevertheless the model has an apparent simplicity and is full of light which makes it very attractive.

While at Forestville I witnessed a tail end smash brought on by operator error and the mighty power of DCC. The layout will be nameless to protect the guilty.

Pirrama Park details for Jane's construction finishes ProjectThe sound of 4205 hitting the guards van was not on any sound card!

Saturday, January 15, 2011

Another Magazine

I was down at Concord buying our afternoon coffee at Del Mondo. There was a bit of a crowd and not enough staff so I wandered next door to the Newsagent and returned with another modelling magazine – Airfix Model World.

Why do I need another magazine? I have hundreds of them in the house and in the shed. Well it goes back to my slightly misspent youth.

Airfix Magazine “for plastic modellers”

Airfix_0001

One day sometime in the late 1960’s I started buying the Airfix Magazine from the East Ivanhoe Newagency. Was it owned by Mr Giles? Later it was Fred and Peter Smythe, who gave me my first and often I think my best job – as a paperboy.

I had a standing order from 1969 and above is an image of one of the remaining early copies I have with the cover intact.

Airfix Magazine was produced from June 1960 to October 1993, was a brilliant marketing tool. It treated the topic of plastic modelling seriously and provided a mixture of news, historical information and articles on conversions and builds. Looking at the April 1969 issue I saw that the series on the Panzer 3 by Peter Chamberlin was concluding, while the “Bombing Colours” series by Bruce Robinson and Michael J.F. Bowyer. this would run for many years and was also a history of the RAF’s Bomber Command as well as the paint schemes of its aircraft. There are articles on model railways, model ships as well as aircraft and war gaming with “Ancient Britons”.  

I spend a considerable time in the alcove that was my bedroom reading the Airfix Magazine and assembling large plastic armies. I developed my annoying habit of referring to sources in arguments with my friends regarding aspects of WWII, aircraft and tanks.

As the years progressed the magazine changed most notably it metricated to A4.

Airfix_0002

The articles became a bit less interesting and the Airfix advertising was decidedly corny (e.g. The Army, The Navy and the Airforce gave it a Whirl  advertisement for  the Airfix Westland Whirlwind H.A.S. Mk 22). There were of course more competitors to Airfix in particular the Japanese who though more expensive in the UK were higher quality and more diverse subjects.

In any case by 1979 I was at Uni chasing after various bands and had even met girls who were not my sister’s school friends! I was surprised to learn that the Airfix Magazine survived till 1993.

Now in 2010 Airfix has been revived and now a new Airfix Magazine has retuned to join the groaning magazine shelves.

Airfix_0003

I probably wont be a regular buyer  but I bought this issue out of nostalgia.

Monday, November 29, 2010

Lidcombe

I had a little project in Lidcombe (NSW). I had never really been there before. I’d been through on the train but on foot I found a neat little shopping centre. Compare this photo looking down Joseph Street taken c1941 with a photo taken in November 2010

Lidcombe

From Wayland, S. C & Lidcombe (N.S.W. : Municipality). Council 1941, Lidcombe and its development as an industrial centre Council of the Municipality of Lidcombe, Lidcombe, N.S.W

(source Wayland, S. C & Lidcombe Council 1941, Lidcombe and its development as an industrial centre, Council of the Municipality of Lidcombe, Lidcombe, N.S.W)

Railway hotel, Lidcombe 

Not much has changed except for the cars and the car parking. Quite refreshing to find these gems.

Thursday, October 21, 2010

VR delivers sleepers

On the VR Enthusiast discussion group Forthbridge asked about how the Victorian Railways delivered sleepers to their worksites. This reminded me of an incident when at the first Lake Condah Mission test excavations. When on returning from a trip to Heywood (14/09/1984) I spied a sleeper train at work on the line from Ararat to Portland (just south of Three Waterholes Road).

I deviated from my route and took some photos:

Sleeper laying between Haywood and Three Waterholes Road, 1st September 1984. Looking west

Sleeper laying between Haywood and Three Waterholes Road, 1st September 1984. Looking west

Sleeper laying between Haywood and Three Waterholes Road, 1st September 1984. Looking west

Sleeper laying between Haywood and Three Waterholes Road, 1st September 1984. Looking west

Sleeper laying between Haywood and Three Waterholes Road, 1st September 1984. Looking west

Sleeper laying between Haywood and Three Waterholes Road, 1st September 1984. Looking west

Sleeper laying between Haywood and Three Waterholes Road, 1st September 1984. Looking west

Sleeper laying between Haywood and Three Waterholes Road, 1st September 1984. Looking west

After I finished I took the next track through a pine forest back towards Condah Mission. I promptly got bogged so bogged that it took a 4wd and two tractors to get the Nissen Bluebird out. To be fair to me the 4wd bogged itself trying to get me out and one tractor also bogged itself.

My employers – the Victoria Archaeological Survey were not amused however members of the Aboriginal community who were with me thought it was a huge joke and I was often asked “seen any good trains lately”?

The images record an interesting scene of railway life.

Sunday, September 5, 2010

Austrains IA wagon - opinions

With the arrival of the over speculated about Austrains “mystery” wagon – the VR I wagon and derivatives, a new era for the VR Enthusiast has arrived. Following on from the I, IA and B from Austrains are Auscuision’s U. T. KMQ as well as a GY and SDS models is promising another GY and a KQ wagon. Can a Z guards van be arriving in the not to distant future?

For the sum of between $25 and $35 per wagon a VR modeller will be able to build up a train of classic VR four wheelers to run behind their diesels. Previously this could only be achieved by assembling the excellent BGM/SEM kits which are about half the price (when you include painting, detailing and couplers but not costing assembly time).

Many modellers have expressed difficulties with the kits, although in comparison with injection moulded kits of AFV’s and Warships, the BGM/SEM kits are uncomplicated and easy to assemble requiring only basic modelling skills. However the RTR manufacturers must sense there is a market for VR four wheelers as there is allot of Chinese moulded plastic en route to Australia (some of which is heading to Concord).

I bought a "combo pack" which had I 15868, IA 14438 and B 69 at the "Our Town Show" on the 4th September 2010. Having some spare time on a Sunday morning, I ran the callipers over IA 14438 and had a detailed look at my purchase.

The sources I used are the usual culprits – the Peter Vincent website, Rob O’Regan’s website and Mark Bau’s website. From these several official diagrams of the IA were obtained which gave wagon dimensions. I converted these to HO scale and then went measuring with my trusty digital callipers.

At this point you need to consider possible sources of error – the conversions (feet to metrics, real to scale) being one obvious one. Then there is the difficulty of measuring. Variations on how you hold the callipers can result in errors. You also need to make sure you are measuring to the same points on the model as on the diagram. for example length over couplers – where on the couplers and don't forget Kadees are over scale so this measurement is inherently inaccurate. In contrast distance between axle boxes is likely to be more accurate as the location of the axles is readily found on both the model and the prototype.

The results are:

Length over couplers: should be 8.7cm my measurements are consistent with this allowing for errors

Interior width: should be 2.97cm is 2.86 cm – probably the sides are over sized  as they are thicker than the SEM ones.

Wheel centres: should be 4.02cm and is  3.91cm

Doors are ok but difficult to measure precisely.

Side height: 1.28cm and is 1.34cm

So the model is possibly slightly larger than 100% to scale but this is less than 1mm so could also be a measuring fault. Comparing the model to one of my SEM IA wagons the Austrains model looks ever so slightly larger which confirms my feeling (assuming David got the SEM model correct).

The model is in some form of shiny plastic (POM?) and the underframe and wheels pop out leaving the wagon sides and a metal wagon floor.

Austrains IA wagon 001

The brake rigging is simplified and will need some beefing up – this is my preference. The brake cylinder is at a very odd angle, again it could be left or fixed. The grab irons, coupler pin lifter and tarp supports are all fine details. both the tarp supports and the coupler pin lifter move.

The interior has timber detailing on the floor but no side detail. I think the doors should be thinner than the sides according to the diagram. This challenge as been avoided by Austrains and SEM no doubt due to cost.  

The wagon weights 20g which is a bit light for both NRMA and NEM standards. The bulk of the weight is the floor which is metal.

The model is finished in a representation of VR wagon red with white steps and white squares in corners. Basically it looks far too clean for a wagon constructed in 1915 and will need to be detailed to fit in with the owners preferences. The photos of the wagons in the 1970’s show them to be fairly bashed and battered (reflecting over 50 years of work) and the Austrains model from the box looks far too neat and kempt whereas it should be IMHO unkempt.

So if you want a model you can plonk on the tracks and run, this will do the trick – it looks good and although it is slightly larger than it should be this is not really going to be noticed I think (unless you are wondering around with callipers and a VR diagram).

Austrains IA wagon 006

(above Austrains and SEM IA wagons

In contrast my SEM IA wagons are still not finished after intermittent progress since 2002 (or possibly earlier) and some of the handrail details are much finer than my attempts at wire bending, it’s back to the work bench for me to improve these details.

Also on the workbench at some stage will be the RTR  IA’s for weathering and minor detailing. My preference is for rolling stock that look like they have been used and the Austrains finish is too slick for my preference. I am also wondering whether it might be possible to scribe representations of the doors on the inside of the wagon.

To conclude; I am happy that I have got these wagons and that I have ordered more. They will complement my existing completed and to be completed SEM models. If I just want to run a train, then these wagons are ready to go. They will need some work to finish them to my personal preferences which to some degree negates the RTR aspect but consider the lack of progress I have made on the SEM kits. Therefore the Austrains wagons suit the time poor. 
Austrains IA wagon 005